How to Recreate Outlook OST File in an Easy Way
Microsoft Outlook is an email client which plays an important role in computing. MS Outlook has a unique feature in which user can work in offline mode when exchange server connection is not available. A user can do his/her work without any interruption while working in offline mode. The Outlook creates an OST file automatically for storing user data which instantly sync automatically when the server connection is available. But, sometimes this OST file shows an error message and gets corrupted. In such a messy situation, users choose to get an instant manual solution to Recreate Outlook OST File. But, this method is a bit lengthy and it is mandatory that the user must be a Technically sound to deal with the manual process. Through this article, we are going to help users who want to fix this issue step by step using manual methods and an automated Solution.Necessity to Recreate Outlook Profile
Microsoft Outlook saves the files in two formats i.e. OST & PST in which OST file format is built in offline mode when exchange server is not available. It gets synchronized with Exchange Server whenever the connection is available. But, sometimes OST file encounters a problem as there few reasons behind the error in OST file:- 1.The OST File got corrupted.
2.The Outlook Mailbox filled with OST Files gets oversized.
3.The OST File got deleted due to Virus intrusion.
4.The Synchronisation of OST File failed.
Above are some common reasons behind different errors in OST File. Hence to overcome these issues, users have to repair or restore its corrupted OST files. Also, the user can simply recreate OST file in Outlook by following some step by step of the manual methods:
How To Recreate Outlook OST File
Below mention are the few steps for the different version of Outlook. The user can choose different methods for their respective MS Outlook versions.Steps To Recreate OST profile 2016/2013/2010/2007
For Recreating Outlook OST, a user needs to follow few simple steps for different Outlook versions to recreate Outlook OST file. Below steps can be followed for the same:- 1. To initialize the procedure first open MS Outlook Application then click on File tab in Outlook 2010, 2013, 2016 & Tool menu in Outlook 2007.
2. Click on account setting & double click on MS Exchange.
3. After that Then hit on more setting button.
4. Then, Advance Tab>Offline Folder Setting.
5. In this step provide the path to save OST file & click OK.
6. If you notice an error message then simply click OK.
“
7. At last click on OK & Finish.
STEPS TO Recreate Outlook OST File 2003/2002
The user must follow the below mention steps & after that user must synchronize their data.- 1.To initialize the procedure user first open Outlook & click on Tool Menu.
2. After that click on view or change existing mail account then after click next.
3. In the following Dialog Box locate for Outlook process email for those accounts & after change click on Microsoft Exchange Server.
4. More Setting -> Advance Tab after that click on Offline Folder File Setting.
5. After that FileBox provide to save user OST File(by default ost file name is Outlook .OST).
6. If Error message is prompted then simply click OK.
“
7. In Final Step simply click Next then Finish.
Drawbacks
Above manual solution are used to recreate Outlook OST file but it consists limitation embedded with it. Below are few drawbacks for this:- 1. Manual methods are not proper methods to Recreate ost file.
2. Manual methods are vast & complex.
3. The Strong Technical skill required before initializing the process.
4. High Risk to Loss of User Data during the process.
Expert Solution To Recreate Outlook OST File
As we discussed above the manual methods is not a wise & a proper method to Recreate Offline data file in Outlook. As it consists many drawbacks too. Hence, user required to have a third party tool i.e. SysTools OST to PST Converter. The tool is designed especially to recreate OST file in which it first repairs it & then export Outlook OST file to PST file format which can be used easily with any version of Microsoft Outlook.Features
- 1. Convert all data from OSt file like Emails,contacts,etc.
2. It also supports deleted data restoration from OST Files.
3. This tool provides date filters to export Outlook OST file by date.
4. the installation of Outlook is not necessaryfor this tool.
Final Words
In the above article, we have discussed manual methods to Recreate Outlook OST File.As we all know that OST file is very important for the user so we can recreate it by above manual methods if the user were unable to rebuild the file, then it is advised to switch to a professional solution mentioned above.Recover Deleted Email From Thunderbird with X-Mozilla-Status
Simplest Way How to Recover Permanently Deleted Email From Thunderbird
Most of the users have an unpleasurable experience of Thunderbird because they have deleted their email messages from Inbox as well as Trash folder by mistake. Moreover, it is really difficult if the deleted mail contains an important information. When users have faced such situation, then, they must have to recover deleted emails from Thunderbird. In the following section, we are going to discuss different approaches to Recover Deleted Email From Thunderbird in an efficient way. Here, the most common query that a user faced as discussed below:Thursday 20 July 2017
Merge Thunderbird Mailboxes to Combine Multiple Mozilla Profiles
How to Merge Thunderbird Mailboxes from Two Separate Mailboxes/Profile
Many email clients are there like Entourage, Thunderbird, and Apple Mail, etc that support this MBOX file-format. MBOX mailboxes consist of all mail messages from 1 single mailbox in one particular file. In Mozilla Thunderbird email client application, you can easily configure multiple emailing accounts. However, if you have multiple email accounts and many mails, then it is considered better to Merge Thunderbird Mailboxes into one file for easier management through better search and faster email retrieval by the process described below to merge Thunderbird folders.Query to Merge Thunderbird Mailboxes
Many users frequently face issues while a user tends to combine Thunderbird Profiles. One of these users wrote this query after encountering the same issue. He said that presently he was using Mozilla Thunderbird email application wherein he had five accounts and there were a large number of email folders in his mail-client. It became rather tricky for him to search for any specific emails from all those massive number of folders due to duplicity issue. So, now the requirement was of some solution for merging MBOX mailboxes so that he could also refine his search while looking for some emails & merge Thunderbird folders.The Need to Merge Thunderbird Folders
The need to Merge Thunderbird Mailboxes arises due to several reasons. Some of these are discussed underneath:• Some users face this need to combine Thunderbird Profiles for speeding up the search & retrieval of some specific emails from multiple folders or multiple email accounts.
•Sometimes the requirement arises when users have to use the merged file, which is a bigger file, with other some email client like Microsoft Outlook.
•The same requirement is there when users have to remove some duplicate mails or some duplicate data so as to increase some free space on the hard disk drive, which can be done when trying to merge Thunderbird folders into 1 single folder.
•Multiple MBOX mailboxes can be managed better when merged together into one single archive file.
Manual Way for Combining Multiple Thunderbird Mailboxes
The method involves 2 stepsStep 1: MBOX conversion
Step 2: To combine Thunderbird Profiles, as follows:
STEP ONE: Importing MBOX Emails
MBOX format and Outlook are belonging to 2 separate platforms. Considering this, MBOX conversion is an intricate task not suggested to be done manually being a lengthy and impractical process in any real-world scenario. Using some good MBOX conversion tool is recommended for converting MBOX format to Microsoft Outlook.After which we can easily merge Thunderbird foldersSTEP TWO: Merge Thunderbird Mailboxes
After email importation in Outlook, step 2 involves to combine Thunderbird profiles . This is done when master-archive-folder is created as shown below:• In Outlook, form new PST file, which is Master-Archive
• Click File
1. Go to Account settings
2. Then Data Files
• Browse location
• Keep new name for Master-archive-folder
• Click File
• Go to Open
• Then Outlook-Data-File
• Connecting of master-archive has to be done for all mails being imported in last step 1
• Copy content to this particular file
• Disconnecting of previous archives
• Saving of new master file is needed in the default archiving location
• This is done by Auto-Archive settings as follows
3. Click File
4. Go to Options
5. Then Advanced
6. Then AutoArchive settings
• This would help in merging MBOX mailboxes in Outlook in PST format
Another Way to Merge Thunderbird Profiles
Manual way to Merge Thunderbird Mailboxes is a taxing one on time and effort with all the risks associated with data loss as well. The process is a confusing one for novice users and users, who are not well-versed with technical terminologies, cannot really perform the process without any glitches! Thunderbird and Outlook are needed too to perform the operation. Chances of data loss cannot be ruled out. So, better alternative and an easier one for merging MBOX mailboxes is to use some high-performing commercial tool like SysTools MBOX to PST ConverterConcluding Remarks
For merging MBOX mailboxes together into 1 place, above mentioned manual approach can be used but an expert third-party solution is developed with much expertise, thus saving users’ time & effort a great deal. This blog discussed both these approaches, one of the manual method to Merge Thunderbird Mailboxes and other of the professional tool for dealing with such problem of large data in MBOX mailboxes and merge Thunderbird foldersEasy Way to Sync Data from Gmail to Thunderbird Email Account
Gmail to Thunderbird: Configure your Gmail Account in Mozilla Email Client
Did you know that you can access your Gmail account inside the Thunderbird (Mozilla Email Account)that is a desktop based email client? Gmail is a convenient efficient email service on the web. Thunderbird makes it easy for all the people to manage both Gmail and Thunderbird account on the same interface without facing any problem. Thunderbird makes it easy to access a Gmail account. It’s just done in few settings & all you need is only your Gmail credentials. So, we can easily migrate from Gmail to Thunderbird. Here we are showing you method for moving your account using manual method & using third party tool.
Methods to Sync Gmail to Mozilla Thunderbird
There are various methods for moving your Gmail account to a Desktop email client. The first method is by configuring the web account to a desktop that is one of them that all of us do. The second method is to use one of the Google services that are Google takeout that backup our data. All these are manual methods. The third or last method is to use a third party tool to move emails from Gmail account to Thunderbird.
How to Configure Gmail Mailbox to Mozilla Email Account
For configuring Gmail account in Mozilla Thunderbird the user needs to enable IMAP in their Google’s Gmail account. The IMAP is better than the POP3; So, we use IMAP to sync Gmail to Thunderbird. Follow the below steps:
- 1. Firstly, Log-in your Gmail account & enable the IMAP in the Settings under Forwarding and POP/IMAP tab & click on Save Changes button.
- 2. Now open Thunderbird go to File >> New >> Existing Mail Account.
Go to Tools >> Account Settings >> a new window opens click bottom left Account Actions >> Add Mail Account. - 3. After this Mail Account Setup window opens; Fill Your Name, Email address of Gmail & Password of Gmail then click on Continue button.
- 4. Select IMAP(remote folders) & click on Manual config button.
- 5. Now we have to manually change the settings under Server hostname section.
- Incoming: imap.gmail.com / Port:993 / SSL: SSL/TLS / Authentication: Autodetect.
- Outgoing: smtp.gmail.com / Port:25 or 465 / SSL: SSL/TLS / Authentication: Autodetect.
- The Username will be your Gmail ID.
- 6. Click Re-test.
Now if you entered everything correctly then this will be completed successfully & you can click on Create Account button.
For now, after you can easily check your Gmail in Thunderbird by clicking on Read messages or Inbox.
Setup your sent folder properly
- 1. Thunderbird >> Tools >> Account Settings >> Copies & Folders: set Place a copy into Sent Items on the mail server.
- 2. Restart Thunderbird.
How to Backup Gmail to Thunderbird
In this, you can get all your data backed up using a service provided by Google that is Google takeout that is used to backup your data to MBOX file format & other formats also. By Exporting all the data you can move it to the Desktop based email client(Thunderbird).
Steps for taking backup your Gmail to MBOX are:
- 1. Firstly, Log-in to your Gmail account.
- 2. Type URL- https://takeout.google.com/settings/takeout in the next tab, Now select the products to include in backup & configure the settings for each product & click Next.
- 3. Now Customize the archive format select File Type-.zip, Archive size-1GB to 50GB & select the Delivery Method as you want it & click Create Archive.
- 4. After this, the process is starting to back up your data & it shows a message on the screen that “Please note that archives may take a long time (hours or possibly days) to create. You will receive an email when your archive is complete.”
- 5. Click on Manage archives and it shows to download the file click on Download button. Now it lets you log-in again for verification after that it starts downloading the backup file.
Now your backup is ready to transfer into Thunderbird.
Steps to Move MBOX file to Thunderbird are:
- 1. Open Thunderbird account and go to Tools.
- 2. Select "Add-ons" from the Tools menu.
- 3. Select the ImportExport Tool and Click "Install”.
- 4. Now, restart Mozilla Thunderbird. Select "Import/Export in .mbox format" from the "Tools" menu. Click "Import mbox file."
- 5. Select the MBOX file you want to import and click "Open."
Master solution: Configure Gmail in Thunderbird
As we see above all the manual methods that need a full internet connection or many technical steps to complete the process. For the manual configuration, a non-technical user will get stuck in it. Here is a master solution for download Gmail emails to MBOX using Gmail Backup tool. With the help of this tool, you can export Gmail to Thunderbird. It is easily operated by technical as well as non-technical both users. Having user-friendly environment. Now it will give you the backup in MBOX file that you can transfer in Mozilla Thunderbird account.
For moving MBOX file to Thunderbird you have to download the Add-on of Import/Export tool in Thunderbird. After that, you start the process. So, as you see that the manual method of moving MBOX to Thunderbird is too lengthy; Here is the Thunderbird Import Wizard tool that helps you to import multiple MBOX files into Mozilla profile in just a few clicks.
Conclusion
In this article, we get to know all the manual & third party methods to migrate from Gmail to Thunderbird. After comparing the results. It is suggested to go for an automated solution as it completes the process in few clicks, saves the time, having full security to our data & no chances of data loss and file corruption.
Tuesday 18 July 2017
Outlook 2003/07/10/13/16 Deleted Items Folder Missing
Main Features of Outlook 2007:
1. Changes in User Interface• The addition of ribbons to certain forms of contents
• some common functions are on the Messages, Insert, & Format Text tabs
• The Office button has been replaced by File menu button
• Quick access to toolbar customization
2. The Calendar Updates
• The To-do bar shows the calendar, newly arrived messages in one place
• Upgraded calendar with a task view
• Can easily share your schedule with others
3. Improvement in Search
• Can easily search for Outlook items
Main Reasons for Outlook 2007 Deleted Items Folder Missing Error
Outlook is the most used email client among users, but sometimes users come up with some errors that result in no access to the Outlook account. Among those errors, one such is Outlook Deleted Items folder missing error. This Error basically occurs when the Deleted folders go missing from MS Outlook or when Outlook stops working. There are many times when deleted Outlook folders go missing or hidden from Outlook 2003/07/10/13/16. The data folders of Outlook can be lost due to the reasons which are stated below:• Virus attack to Outlook
• Software basically conflicts in the working
• Corruption with Outlook 2007 configuration
Manual Methods to Solve Microsoft Outlook Deleted Items Folder Missing Error
Create new profile & check if it is being displayed
Method 2:
Start Outlook 2007, Go to Start -> Run -> type “outlook.exe / resetfolders” cmd.
Method 3:
In the case of no deleted items folder in outlook 2007, you can try the inbuilt functionality of Diagnose & repair facility which is provided by MS Office.
Method 4:
One main reason for this error is that you don’t have a delete folder in the IMAP account.
To see the folders which are available for your IMAP account follow the steps which are mentioned below:
• First, select “Inbox” folder of IMAP account
• Now select “Folder” tab from the ribbon
• Click “IMAP folders”
• A dialog box will appear with a query button, press the button
• Select all folders which you want in Outlook’s
• Now click the subscribe button
• Then click OK
Create Folders to Resolve Outlook Deleted Folder Missing Error
If the IMAP account does not hold deleted folder now also, you can create them manually. You can do this by selecting New Folder button on the Folder tab.While trying to make a folder you can be stuck with this type of error:

In this scenario, it is clear that your IMAP account will not accept a new root level folders. You can now create these folders as the sub folders or the children's folders of the inbox folders.
Assign the Folders
Now the deleted folders have been created on your IMAP account, you can now configure MS Outlook to use or work with those folders as such. This happens when you delete the very first message after creating these folders.If this does not happen you can get the folders manually in a below-mentioned way in case of Outlook 2003/7/10/13/16 deleted items folder missing.
1. Open IMAP account settings
2. Press More Settings button
3. Now press the Sent items tab
4. Now select “save sent items in the folder on the server” option
5. After that select the folders you want to store these items into
6. Select the Delete item tab
7. Now select “Move deleted items to the following folder on the server” option
8. Select that folder you need to store the deleted items
9. Press OK to close the settings
10. Click on Next & then finish to confirm the changes
11. press Close to close the account settings
If none of the above solutions works then you can refer any third party tool to recover deleted folder missing error and can easily make use of the software to fix outlook 2003/7/10/13/16 deleted items folder missing scenario.
Expert Solution
With SysTools Outlook Recovery Tool you can easily recover missing deleted folder in Outlook. The software can easily fix corrupt or damaged OST file issue. Also, it allows you to recover deleted Outlook OST files in just a few simple steps. It is also capable in removing minor as well as major corruption from the corrupted Offline storage file.Conclusion
There can be various situations like deleted folder missing from Outlook 2013. So to solve this error one need to restore those missing deleted folders. Here we have used some manual methods which will help you fix Outlook 2003/7/10/13/16 deleted items folder missing. But there are some limitations of these methods like they are cumbersome, lengthy and time-consuming. So keep those limitations in mind we have introduced you with Outlook Recovery tool which will recover the error Microsoft Outlook 2007 deleted items folder missing.Monday 17 July 2017
By Convert My Emails
In: Combine Multiple PST Files, Merge Outlook PST Files, Merge Two Archive PST Files
 No comments
How to Merge Two Archive PST Files in Outlook 2016/13/10/07
Merge Two Archive PST Files: Expert Tips
Need to Merge PST files Outlook 2016
Manual Method to Combine Multiple PST Files
FIRST STEP: Creating fresh new blank PST file
• Then, More Items
• Then, Outlook-Data-File
• Now, the next step is to select some location for saving this new blank PST file
• Then, give a name
• Finally, click OK
SECOND STEP: Merge two archive PST files
To merge two PST files 2016 into this new PST file created now, the steps below can be followed:
• In Outlook’s window, click File
• Then, Open
• Then, Import
• This opens the Import-Export Wizard
• Now, you need to select Import-from-another-program-or-file
• After that, click Next
• Select file type as Outlook’s Data File (PST) for importing
• Now, again click Next
• Click Browse for locating the file that is required to be imported
• Check the box for Do-not-import-duplicates
• Click Next once again
• Now, select which folder is required to be imported
• And then, check the Include-subfolders-and-Import-items-into-the-same-folder-in-boxes
• Finally, click Finish to merge two archive PST files Outlook 2010
A Quick and Simple Alternative that merge PST files outlook 2016
Final Clause
Thursday 13 July 2017
How to Open MBOX files in Outlook 2019, 2016, 2013, 2010, 2007?
Complete Guide on How to Open MBOX in Outlook
Need: Open MBOX in Outlook
• It is not necessary to have an Internet connection to access previously downloaded emails and users can even work offline with the help of Outlook.
Manual Solution: Open MBOX in Outlook
How to view MBOX files in Outlook using the manual method? It would require many email applications. Take the backup of MBOX files before starting the processStep 1: In AppleMail
• Launch AppleMail and click on File>>Import Mailboxes
• Choose the program from where the data is to be imported, under Import data from:
• Click on Continue button and give location where MBOX files are stored on system
• Choose MBOX data files that you want to import and click Choose
• Select desired items and click Continue
• Click on Done and browse the Import section in the mailboxes list
Step 2: In Eudora
• Add MBOX file extension to the file that is imported.
• Move this to Eudora directory. Default location of the file is
“C: Documents and Settings<user>Application Data\Qualcomm\Eudora”
• Open Eudora and double-click on the test MBOX.mbx and close the application
Step 3: In Outlook Express
• Launch Outlook Express
• Go to File >> Import >> Messages
• Choose Eudora from the list of email applications and choose Next
• Browse the location to select the .mbx file and click OK
• Click on Next >> Next >> Finish
Step 4: In MS Outlook
• Go to File>>Open, in MS Outlook
• Now, from the available list choose Import and then Import and Export Wizard
• Choose Import Internet Mail and Addresses and click Next
• Choose Outlook Express 4.x, 5.x, 6.x or Window Mail
• Make sure that the option of Import Mail is checked and click Next
• Now the users can open MBOX in Outlook
Limitations of Manual Method
• Data loss
• Data corruption
• Lengthy and tedious process
Automated Solution: Open MBOX in Outlook
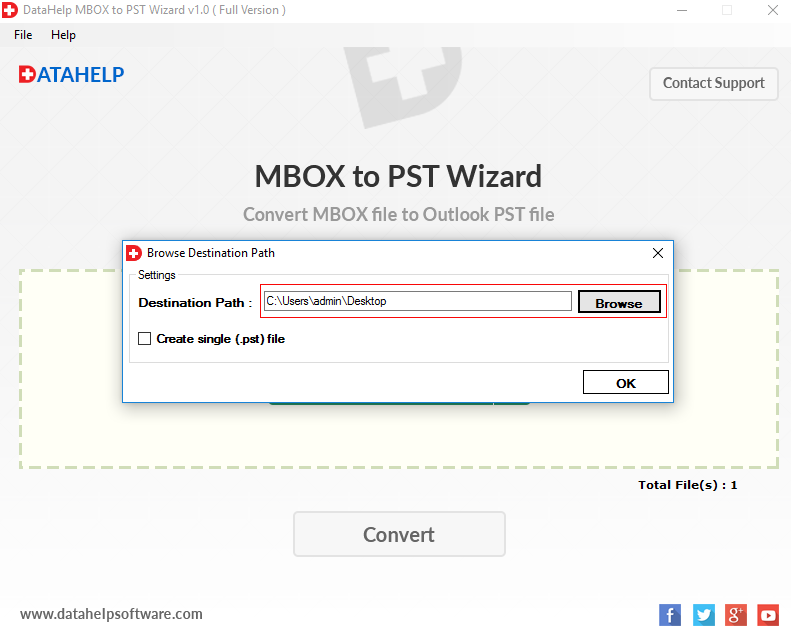
Use DataHelp MBOX to PST Converter to quickly generate Unicode PST files for Outlook 2019, 2016, 2013, 2010, 2007 & 2003. You can directly generate a single Outlook data file for all the MBOX files or create one PST separately for each MBOX. You can even drag and drop the mailbox files directly on the software interface to add and process them.
Steps to Open MBOX file in Outlook:
- Run the DataHelp tool and "drag and drop" the MBOX file onto the software interface.
- Once the files are added, click "Convert" button at once.
- "Browse(..)" the location to save the Outlook data files and click "Ok" button.
- The software will convert the files and show the confirmation window.
- Now, use the "Import/Export" option of Outlook and import the PST files in your Outlook application.


This blog is for Windows users only. For Mac users, please read the article to migrate MBOX to Outlook on Mac.
Bottom Lines
How to Migrate Spicebird to Thunderbird: Find Trouble Free Solution
Spicebird to Thunderbird: A Hassle-Free Approach to Import Emails
Consider the Scenario Related to Importing Spicebird Mailbox to Mozilla Email Client
Why We Need to Convert Spicebird to Thunderbird
Export Emails from Spicebird to Thunderbird
Step 1: Backup Spicebird Mailbox to MBOX File Format
To achieve MBOX file, follow the below-mentioned steps:1. Open Spicebird email on your machine and choose the profile whose MBOX is required.

2. Now, hit on the mail profile of Spicebird and then go to Account Settings.


4. Open Windows Explorer on your machine and paste the copied location in it.
5. Rename the file having no extension with .mbox. For example: rename Inbox file with Inbox.mbox.
Step 2: Transfer Spicebird MBOX to Thunderbird: Thunderbird Import Wizard
Features of Spicebird to Thunderbird Import Wizard
1. The utility completes its migration without any error message or data loss. It ensures users that it will maintain formatting throughout.
2. It allows users to store multiple Spicebird email folders to Thunderbird in bulk manner.
3. Provide a smart feature to move data in targeted Thunderbird profile only.
4. Email attributes like color, font, images, text, hyperlinks, etc., and header formatting all remain same till the end.
Steps to Import .mbox File of Spicebird to Mozilla Thunderbird
1. Launch the Thunderbird Import wizard on your system

2. Click on Add Files (for a single file) or Add Folder (for folders). Here you have to browse Spicebird backed up mailbox files.

3. Hit on Next once you are done with browsing of Spicebird files.

4. Click on Import button to start moving MBOX in Thunderbird.

5. Close the software and open Thunderbird to view the file.

To understand more about this product, visit: https://www.systoolsgroup.com/thunderbird-importer/
Observational Verdict
How To Restore OST File Outlook 2013 – Trouble Free Solutions!
Need to Restore OST file Outlook 2013
OST files sometimes show bad behavior such as inaccessibility, corruption etc due to reasons like accidental deletion of user account, virus attack, crash etc. Under such situations, the user looks for the options to restore OST file Outlook.The corruption cases classified in two categories that is hardware and software reasons:
Hardware Causes
1. Failure of Data Storage Device – If data storage device containing OST files has some bad sectors, then it may damage the data. So there is a
need for recover OST file Outlook 2013
2. Failure of Networking Connection – OST files are synchronised with the Server through a network connection. If there is a network fail, then
the synchronization process fails.
3. Power Failure – If a power failure occurs when accessing the Exchange Server OST files, the OST files are most likely to corruption. So
restore emails from OST file by using some methods.
Software Reasons
1. Incorrect File System Recovery – A file system recovery may cause OST corruption when file system is broken.
2. Virus And Other Malicious Software – Viruses can infect and damage the OST files so in this situation recover OST file Outlook 2013 needed to
perform.
3. Synchronisation Error – The synchronisation failure between the offline folders and the Server may also lead to synchronisation errors.
4. Abnormal Outlook Termination – if Outlook is shut down abnormally without quitting Outlook and Windows normally it may get corrupted.
Manual methods for Restore OST file to PST:
Method 1: Rebuild OST file in MS Outlook 2013
OST file is a copy of the mailbox that is present in the exchange server. So an easy option is to re-create the OST file is by downloading a copy of the items again. So follow the bellow steps for perform connect ost file to Outlook manually:
1. Close and Exit MS Outlook 2013 to restore emails from OST file.
2.Go to Start then Control Panel and double click on “Mail”
In the dialog box, the current profile is displayed in the title bar. If you want to choose a different profile, select “Show Profiles”, then
select “profile name” and click “Properties”.
3. Within the dialog box, click “E-mail Accounts”.
4. Select Data Files tab, click “Exchange account” and then click “Open File Location”
5. Close both of the Mail Setup and Account Settings dialog box and return to file explorer window.
6. Within the file explorer window, select “Exchange data file” and then right-click on it. Click “Delete”.
When you re-open the Outlook, a new OST file is created for the account.
Method 2: Update Folder for Restore OST file to PST
Can repair the corrupt OST File by only updating it.
• Right click on the folder
• Click “Properties”
• A dialog box will pop up. Under this dialog box, click “Clear Offline Items” option
• Click “Ok”
• Now, go to the “Send/Receive” option
• Click “Update Folder” so we can restore calenders from OST file
Automated Method:
The above manual method will not work if Exchange Server is not available due to crashes or something. But third-party OST recovery tools can easily recover mailboxes even from corrupt OST files. That is, you can take the option of purchasing a commercial tool for restore OST file Outlook 2013 . Here there is a tool for this purpose "SysTools OST Recovery Tool". It will recover in accessibile ost file and also restore OST file to PST/ MSG/ EML. More about this tool is listed bellow:
Features:
1. Extract and recover the deleted messages like it can restore calenders from OST file also contacts, tasks etc.
2.Split the exported file into smaller size for avoid the file corruption.
3. For recovering the OST file no size limitation.
4. Quick scan and Advanced scan options are available to restore OST file Outlook 2013.
5. It maintained the email folder structure.
6. Different naming options are available.
Conclusion:
There can be conditions when Offline OST file gets corrupted. So in that case we cannot access the data’s so it is a major issue in technical world. So there is a need to restore OST file Outlook 2013. Her we can use some manual methods described in this article but there are some limitations like time consuming. So in such cases OST Recovery tool is the simple utility which easily recover all the mailbox data of Offline OST file. The software is designed so easily that all types of users can use it without any prior knowledge.
Wednesday 12 July 2017
Ways to Import Turnpike Emails to Thunderbird Efficiently
Monday 10 July 2017
Export Emails to PDF from Outlook- Convert multiple PST to Adobe PDF
Convert PST to PDF -Export Outlook Calendars, Emails, Tasks to PDF Document
Microsoft Outlook has proved to be the most sought-after email client in the present age of Internet communication. End users, as well as IT professionals, use its several productive features to carry out communication seamlessly.
Apart from its useful set of features as a desktop email client, it also gives access to emails, tasks, contacts, schedule, calendars on the move through its Android app.
This makes it a highly preferred application for business as well non-business purposes.
Sometimes the user may want their important email messages, contacts, calendars and other data to be safe from being modified or misused in any way by any third person.
In addition to this, a need for saving the data in a more clear and readable form may also arise among Outlook users. In other words, users may feel the need to convert Outlook PST emails to PDF with attachments.PST to PDF conversion has been a popular query among people who use the MS Outlook email client on a daily basis.
Let us take an example of a user query-
"I am a regular MS Outlook user and I have a lot of emails saved in my account. To make them more portable and for printing purposes, I decided to convert Outlook PST folder to PDF but didn't find any reliable solution for the same. According to me, it will be the best option for keeping my selected emails in hard copy format and moving them from one place to another.Kindly provide a solution on how to convert Outlook PST data to PDF"
One such format that fulfils the above-mentioned needs is the PDF or Portable Document Format. PDF's have been quite successful at providing security of data contained within them.PDF files actually live up to their name as they can be accessed from any platform, be it Windows, Mac or Linux.Also, the well-designed layout of PDF files makes them easier to read and increases the clarity of content.
Hence the most suitable solution for this problem is to convert Outlook PST to PDF format. This article provides the manual steps to convert Outlook PST file to PDF.

Steps to Convert PST Emails With Attachments to Adobe PDF
To convert your PST file data into PDF Document form follow the simple steps-
- Step 1: Download and install the latest Adobe Acrobat Reader.
- Step 2: Open the Microsoft Outlook application and then click on Adobe PDF shown on the Menu bar.
- Step 3: In the sub menu four tabs will be shown
Use the first two tabs to convert multiple Outlook emails from PST into PDF file. - Step 4: The "Selected Messages" option will help to convert several email messages into a single PDF document.
- From the options –"Create New"or"Append to Existing", choose the one according to your requirement
- Right click on the message > Then click on "Convert to Adobe PDF"
- Enter the name by which the resulting PDF file will be saved as.
- Click on Save button.
- The selected email will get saved into a PDF document with its Attachments embedded to the file if any.
- Step 5: The "Selected Folders" option will help in conversion of the entire messages folder from Outlook PST to PDF format.
- Firstly, collect and save all the email messages that you wish to migrate, in a single folder.
- Click on the "Convert Selected Folders
tab. - Now, select the folder which has all the desired emails to initiate the process of conversion of Outlook PST to PDF.
The above steps will export emails to PDF from Outlook if they are performed correctly. When the process is finished, you can view the converted Outlook emails in the Adobe Acrobat Application. Thus the given method also resolves the query about how to view emails as PDF document. Your emails will still be the same content-wise, they will just be transformed into a PDF. All the attachments in the original emails will be displayed as hyperlinks.
Limitations of Manual Method
- You need to have Adobe Acrobat as well as Microsoft Outlook installed and configured on your system to convert PST files to PDF.
- There is no option of creating discrete PDF files for each of the email messages.
- To do this, one needs to repeatedly perform conversion using the "Selected Messages" option.
- The Attachments get embedded within the mail itself and they cannot be extracted separately.
- The manual method is only possible with MS Outlook 2010 and above versions. So if you have lower versions of Outlook installed, this method isn't applicable to you to export emails to PDF from Outlook
Automated Solution For PST to PDF Conversion
For getting rid of the various limitations associated with the manual method to convert Outlook PST to PDF it is suggested that you go for a third party, automated tool such as the PST to PDF Converter
The Converter software provides the facility to create a separate PDF file for each email. You can convert multiple Outlook emails to PDF file format using the software. The tool is available as a demo version which allows users to convert PST to PDF free of cost. Also, the conversion does not require MS Outlook or Adobe Acrobat to be installed prior to the start of the process. All these and several other features make it a far more preferred option than the manual solution to convert Outlook PST to PDF.
Conclusion
The methods to transfer PST file data into PDF form can be either manual or automated. The manual methods are no doubt successful but they have certain shortcomings attached to them. To make the process easier and to perform quick conversion it is advised to make use of a third party tool which overcomes all the shortcomings of the manual approach.
Wednesday 5 July 2017
Exchange 2003, 2007 and 2010 Database Dirty Shutdown

Exchange 2003, 2007 and 2010 Database Dirty Shutdown
Causes Why Any Exchange Database Doesn’t Mount
The issues that prevent mounting of any Exchange Database Dirty Shutdown are as follows:1.MS Exchange’s Information-Store-Service somehow not initialise.
2.Missing MS Exchange’s database files.
3.Exchange’s Database in the state of sudden shutdown.
4.Not sufficient disk space that is free on the database.
5.Insufficient disk space that is free on the log file volume.
6.Loss of underlying storage’s access…
7.Check Exchange Database For Dirty Shutdown.
8.Unable to mount Database Exchange 2010 clean shutdown.
About Exchange Database Dirty Shutdown
What Happens during Dirty Shutdown?
Some Key Questions
1. When was the latest useful backup taken?a. This is needed as users may have to restore data from that backup and after that attempt towards replaying the log files. A backup file is necessary to build so as to get the previous data simultaneously & To Bring Exchange Database clean shutdown.
2. Was that database in its own storage group or in some storage group that is shared by other databases?
a. If that Exchange Database Dirty Shutdown was in the shared SG with other databases that were online, then those may be needed to be taken offline while recovery. So just to be safe, users must move those mailboxes out from that SG before they dismount the “healthy” databases, if that is possible to do otherwise user Exchange Database Clean Shutdown won’t mount.
3. Do the LOG files still exist or they got lost?
a. If the LOG files still exist, then users would be able to replay them for bringing database up-to-date with ESEUTIL /R. However, if the LOG file does not exist any longer, then recovery options would be very limited. Also, if LOG files have unfortunately got corrupted i.e. Logical Corruption Exchange Database, then users can use the /ML switch for testing for those corrupted LOG files.
Steps to Perform Exchange Database Recovery Manually
a. This helps in checking the database status, and that must shows up the Exchange Database Dirty Shutdown.
2. Run ESEUTIL /R
a. If more than one databases were there inside the storage group, then user would need to add the /i option. This is when Exchange Database is in Dirty Shutdown
3. Run ESEUTIL /mh
a. This helps in checking the database status; it must bring Exchange Database Clean Shutdown.
Another Easier Alternative
Conclusion
By Convert My Emails
In: Mbox files to Gmail, Migarte Thunderbird to Gmail, Thunderbird to Gmail
No comments
Export emails from Thunderbird to Gmail using GAMMO Tool
Migrate Thunderbird to Gmail
“I would like to know the procedure (step by step) to transfer all my emails from Thunderbird app into an existing Gmail. Please let me know what I need to set up in my Gmail or Thunderbird (not sure if I need to configure the account setting for both Gmail and Thunderbird) settings in order for the emails to be transferred chronologically into the respective folders into my Gmail”.
This article would provide you with both manual and expert solutions to import Thunderbird emails to Gmail.
Need to Export Thunderbird mails to Gmail
The reasons to export MBOX to Gmail are:
- • Gmail provides a better interface to the users compared to Thunderbird.
- • The future of Thunderbird is less certain.
- • Gmail is really easy to use on the go, as well as on multiple devices and it gives you more than 2.7 gigabytes of storage.
- • Gmail has better attachments and can create task reminders on a daily basis.
- • It preserves messages better compared to Thunderbird and also has advanced search and search operators.
Manual methods to transfer Thunderbird emails to Gmail
- • Log in to your Gmail account.
- • Choose the "Gear" icon and select the "Settings" option.
- • Press "Forwarding and POP/IMAP" tab.
- • Locate the "IMAP Access" heading and select "Enable IMAP."
- • Click "Save Changes" button.
Method: Migrate Thunderbird to Gmail
After setting the IMAP Account, the steps mentioned below can be followed to export Thunderbird Mail to Gmail:- • Double-click on the "Thunderbird" icon to launch the program.
- • Choose "Application Menu" button.
- • Select "Options" from the menu, and then select the "Account Settings" option.
- • Then Click "Account Actions" button.
- • Press "Add Mail Account" button.
- • Enter your name, Gmail address, and password. Click on the "Continue" button.
- • Select the IMAP option and click on the "Done" button. Thunderbird will populate the program with all of your Gmail folders and emails.
- • The final step to import folders from Thunderbird to Gmail is to Copy and paste all the old Thunderbird emails over to one of your Gmail folders. After you copy and paste your files, your Gmail account will update with the new emails. You can now close and delete the Thunderbird application.
Expert Solution
- • Create an Account in Google Apps

- • Launch GAMMO
- • Login to your Google Apps Account

- • Switch to GAMMO for further action
- • Import PST file into Gmail

- • Select the items you want to Import from PST

- • Start Migration process to Import PST into Google Apps

After completion, a message window will get displayed showing successful migration.
